What is MagOneAI Studio?
MagOneAI Studio is MagOneAI’s builder interface — a visual, code-optional environment where business teams and developers create, test, and deploy AI workflows. If you’re building AI automation, MagOneAI Studio is where you’ll spend most of your time. It combines a drag-and-drop workflow canvas, agent configuration, tool integration, knowledge base management, and execution analytics in one unified interface.Access to MagOneAI Studio requires the Org Member role or higher. End Users can only access MagOneAI Hub (the chat interface) and cannot build workflows.
Project structure
MagOneAI Studio is organized around projects — containers that group related resources for a specific business domain or team.Projects as containers
Each project contains:- Agents — AI entities with personas, models, and capabilities
- Use Cases — Workflow definitions (the visual graphs you build)
- Tools — External integrations connected via MCP
- Knowledge Bases — Document collections for RAG retrieval
Project-level member management
Projects have independent access control:- Admin — Full control over the project, including member management and settings
- Builder — Can create and edit resources within the project
- Operator — Can run workflows and chat, but not change configurations
- Viewer — Read-only access
- Inherited access — Org Owners automatically have access to all projects
Project settings and configuration
Each project has its own configuration:- Project name and description — Describe the project’s purpose
- Default settings — Set default LLM models, timeout values, or retry policies
- Environment variables — Project-scoped variables (API endpoints, configuration values)
Workflow canvas
The workflow canvas is the heart of MagOneAI Studio. It’s where you visually design AI workflows by dragging nodes, connecting them, and configuring their behavior.Visual drag-and-drop builder
The canvas provides an intuitive interface for workflow design:- Drag activities from the palette — Add Agent, Tool, Parallel, Condition, Human Task, Sub Use Case, ForEach, or Code nodes
- Connect activities — Draw edges to define execution order and data flow
- Configure each node — Click a node to open its configuration panel
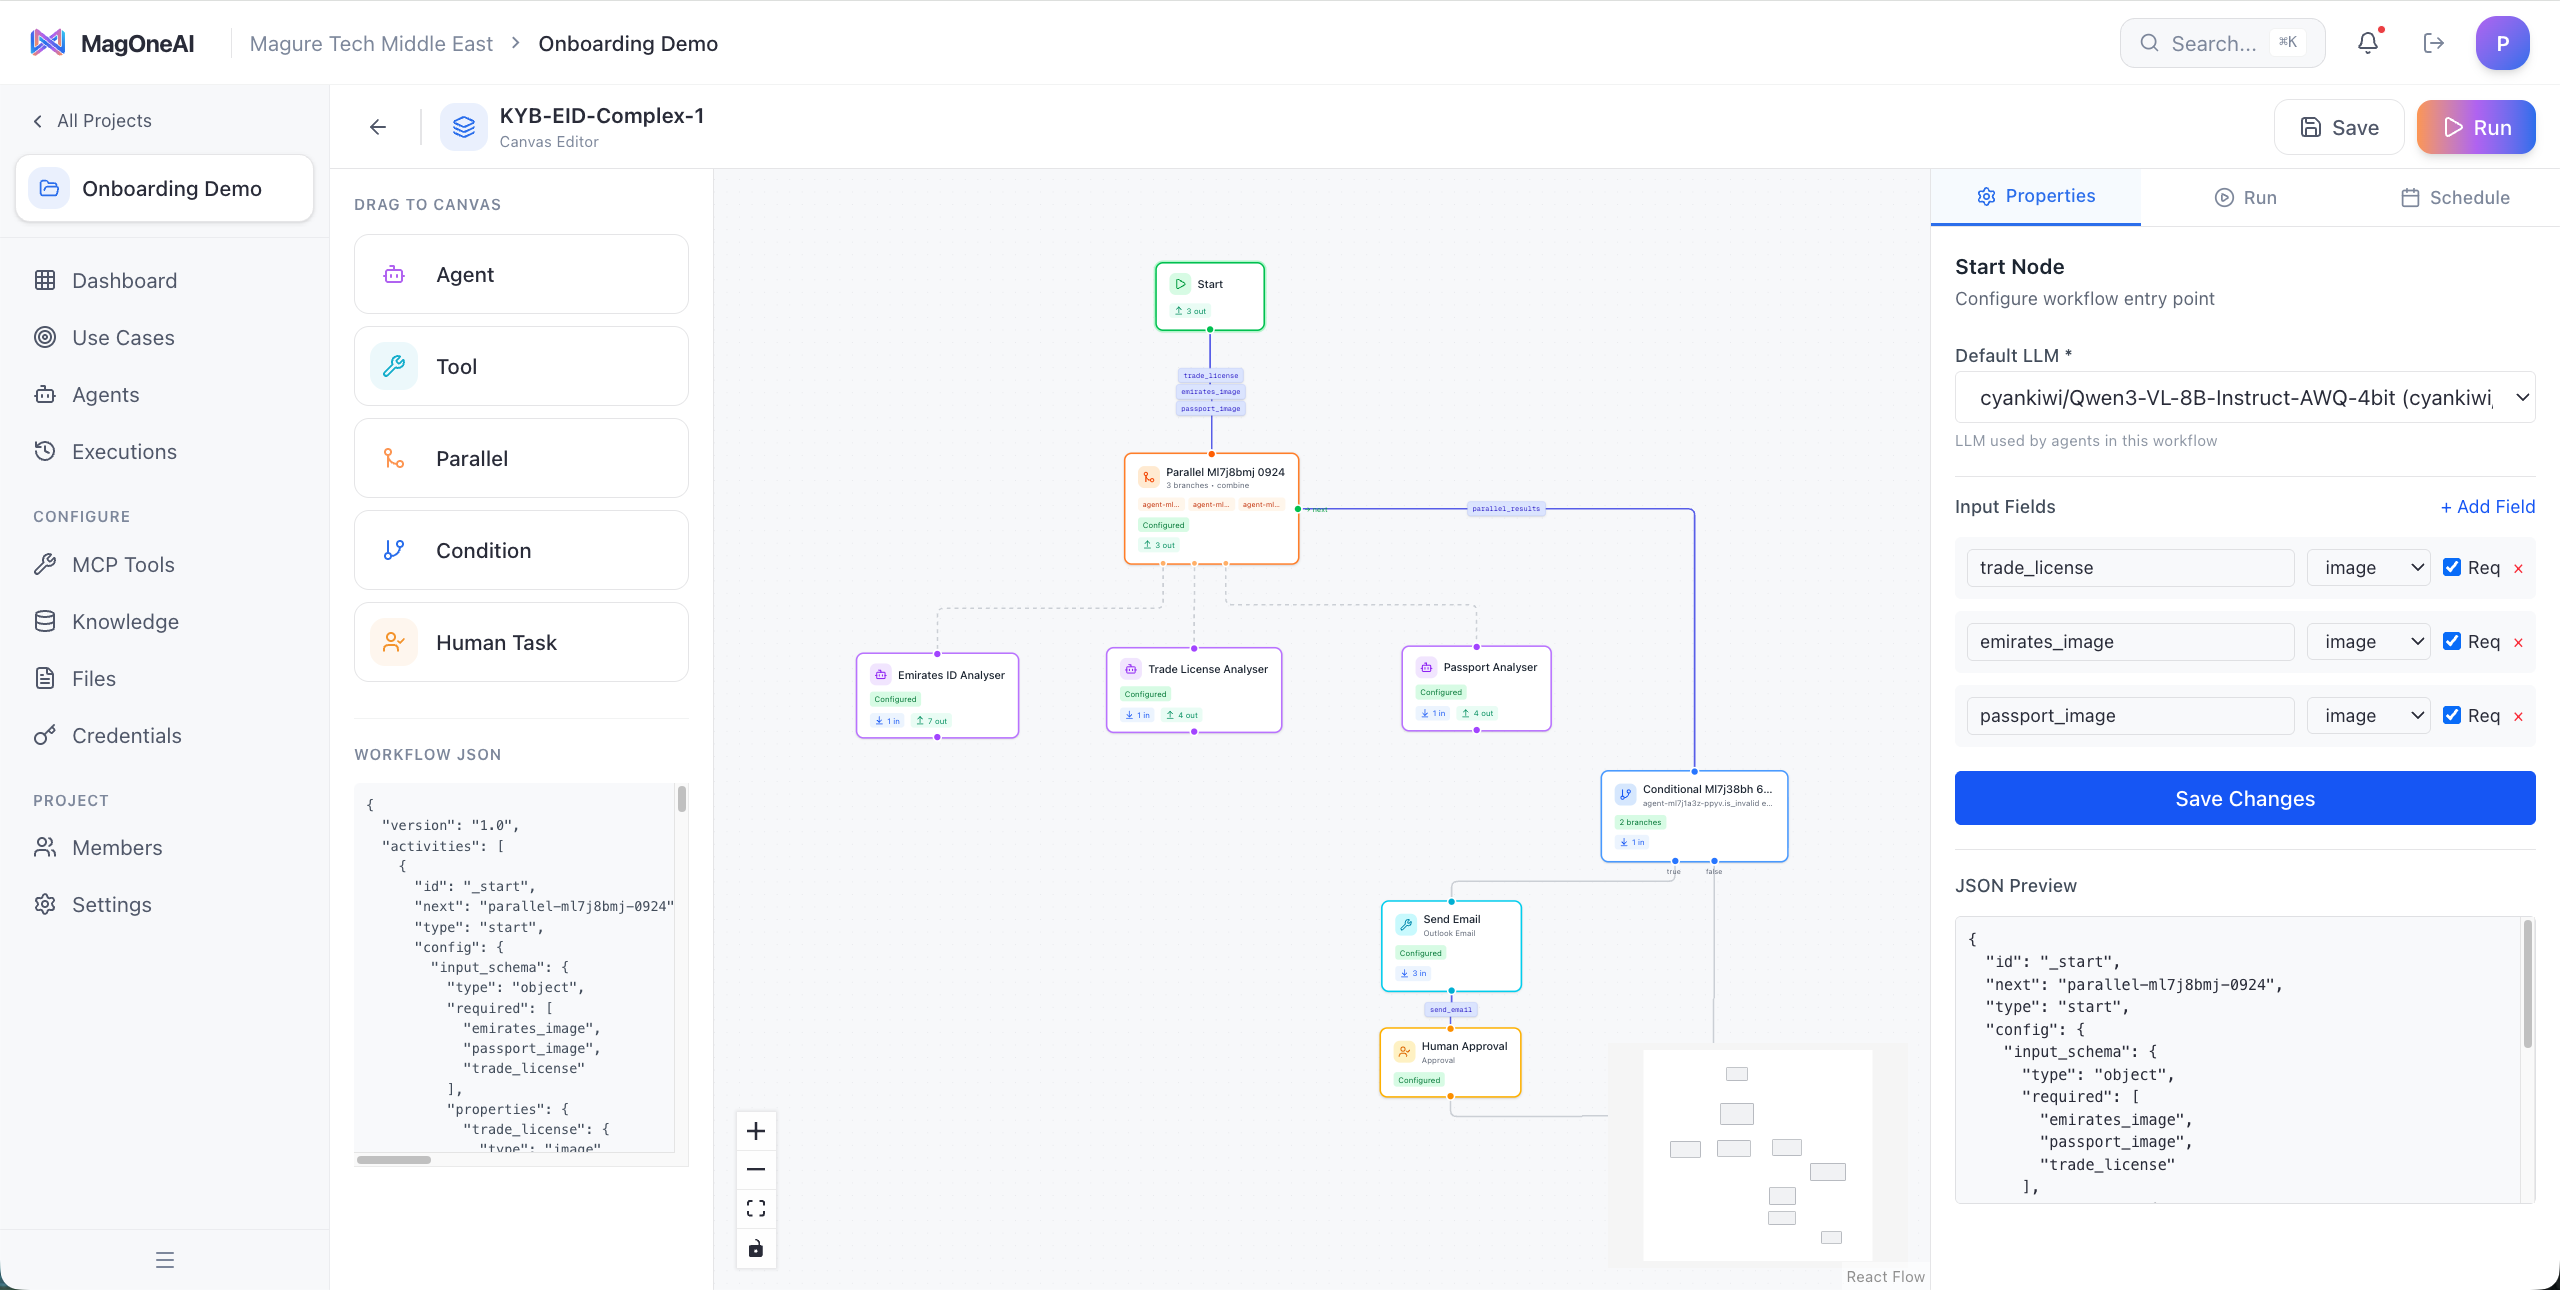

Available node types
MagOneAI Studio supports several activity types, each serving a different purpose:Agent
Agent
An AI entity that reasons, uses tools, and produces output. Configure the agent’s persona, model, instructions, available tools, and connected knowledge bases. This is the core building block for AI-powered workflows.
Tool
Tool
Direct execution of an external capability without AI reasoning. Use this when you need to call an API, query a database, or execute a function deterministically (without LLM overhead).
Parallel
Parallel
Execute multiple branches simultaneously. Useful when you have independent tasks that can run at the same time (e.g., fetch data from three APIs in parallel). The workflow waits for all branches to complete before continuing.
Condition
Condition
Branch based on logic or AI evaluation. You can use simple conditions (e.g., “if score > 80”) or have an AI agent evaluate the condition (e.g., “does this document contain financial information?”).
Human Task
Human Task
Pause the workflow for human approval or input. The workflow creates a task in MagOneAI Hub, notifies the assigned user, and resumes once they respond. Essential for governance and human-in-the-loop workflows.
Sub Use Case
Sub Use Case
Embed another workflow as a reusable module. This allows you to create composable workflows: build a “Document Summarization” use case once, then call it from multiple parent workflows.
ForEach
ForEach
Iterate over a list and execute activities for each item. For example, if you have a list of customer names, you can use ForEach to process each customer through the same agent workflow.
Code
Code
Run your own Python in a secure, isolated sandbox. Use it for custom logic, data transformation between nodes, calculations, or generating output files. See the Code node guide.
Canvas controls
The canvas provides several controls for navigation and layout:- Zoom and pan — Use mouse wheel to zoom, click-and-drag to pan
- Auto-layout — Click the auto-layout button to organize nodes automatically
- Minimap — Toggle a minimap for navigating large workflows
- Grid snap — Align nodes to a grid for clean layouts
JSON view: portable workflow definitions
Every workflow you build is stored as a portable JSON definition. You can:- View the JSON — Click the JSON tab to see the workflow structure
- Export workflows — Download the JSON to version control or share with others
- Import workflows — Upload a JSON file to recreate a workflow
- Version control — Store workflow JSON in Git for change tracking
Agent creation
Agents are the AI entities that power your workflows. MagOneAI Studio provides a comprehensive interface for configuring agents.Create agents with personas
When you create an agent, you define its persona:- Name — A descriptive name (e.g., “KYB Analyst”, “Document Reviewer”)
- Role — The agent’s job title or function (e.g., “Compliance Specialist”)
- System instructions — Detailed instructions that shape the agent’s behavior, tone, and decision-making
Select LLM model per agent
Each agent can use a different LLM model:- High-capability models — Use GPT-4 or Claude Opus for complex reasoning tasks
- Fast models — Use GPT-3.5 Turbo or Claude Haiku for simple, high-volume tasks
- Cost optimization — Assign cheaper models to less critical agents
Attach tools via MCP
Agents can use tools to interact with external systems. MagOneAI Studio’s MCP-native architecture makes tool integration seamless:- Browse available tools — See all tools registered in your project
- Select tools for the agent — Choose which tools this agent can access
- Configure tool parameters — Set default values or constraints
- OAuth flows handled automatically — If a tool requires OAuth (e.g., Google Calendar), the platform manages the flow
- Search tools — Web search, company knowledge base search
- Communication tools — Email, Slack, SMS
- Data tools — SQL queries, API calls, CRM lookups
- Document tools — PDF parsing, OCR, document generation
Connect knowledge bases for RAG
Give agents access to company-specific information by connecting knowledge bases:- Select knowledge bases — Choose from project knowledge bases
- Retrieval configuration — Set number of results to retrieve, similarity threshold
- Automatic embedding — Documents are embedded and retrieved contextually during execution
Configure guardrails and output schemas
Add constraints to ensure agents behave as expected:- Output schemas — Define the structure of the agent’s output (JSON schema)
- Response validation — Ensure outputs match expected formats before continuing
- Retry policies — Automatically retry if the agent produces invalid output
- Timeouts — Set maximum execution time to prevent runaway agents
Tool connections
MagOneAI Studio makes it easy to connect external tools via the Model Context Protocol (MCP).Connect tools via MCP protocol
MCP is an open standard for connecting AI agents to external systems. MagOneAI Studio is MCP-native:- Register MCP tools — Add tools by providing their MCP endpoint or configuration
- Standardized interface — All tools follow the same protocol, making integration consistent
- Automatic discovery — MagOneAI Studio discovers tool capabilities and parameters
- Security built-in — OAuth flows, API key management, and access control are handled by the platform
OAuth flow management
For tools that require OAuth (Google, Microsoft, Salesforce, etc.), MagOneAI Studio manages the entire flow:Authorize access
You’ll be redirected to the provider’s login page. Sign in and authorize MagOneAI to access the service.
Store tokens securely
OAuth tokens are stored in HashiCorp Vault and automatically refreshed when they expire.
Custom MCP tool registration
You can integrate custom tools by implementing the MCP protocol:- Build your MCP server — Expose your tool as an MCP-compliant endpoint
- Register in MagOneAI Studio — Provide the endpoint URL and authentication method
- Use immediately — The tool appears in the tool palette for agents to use
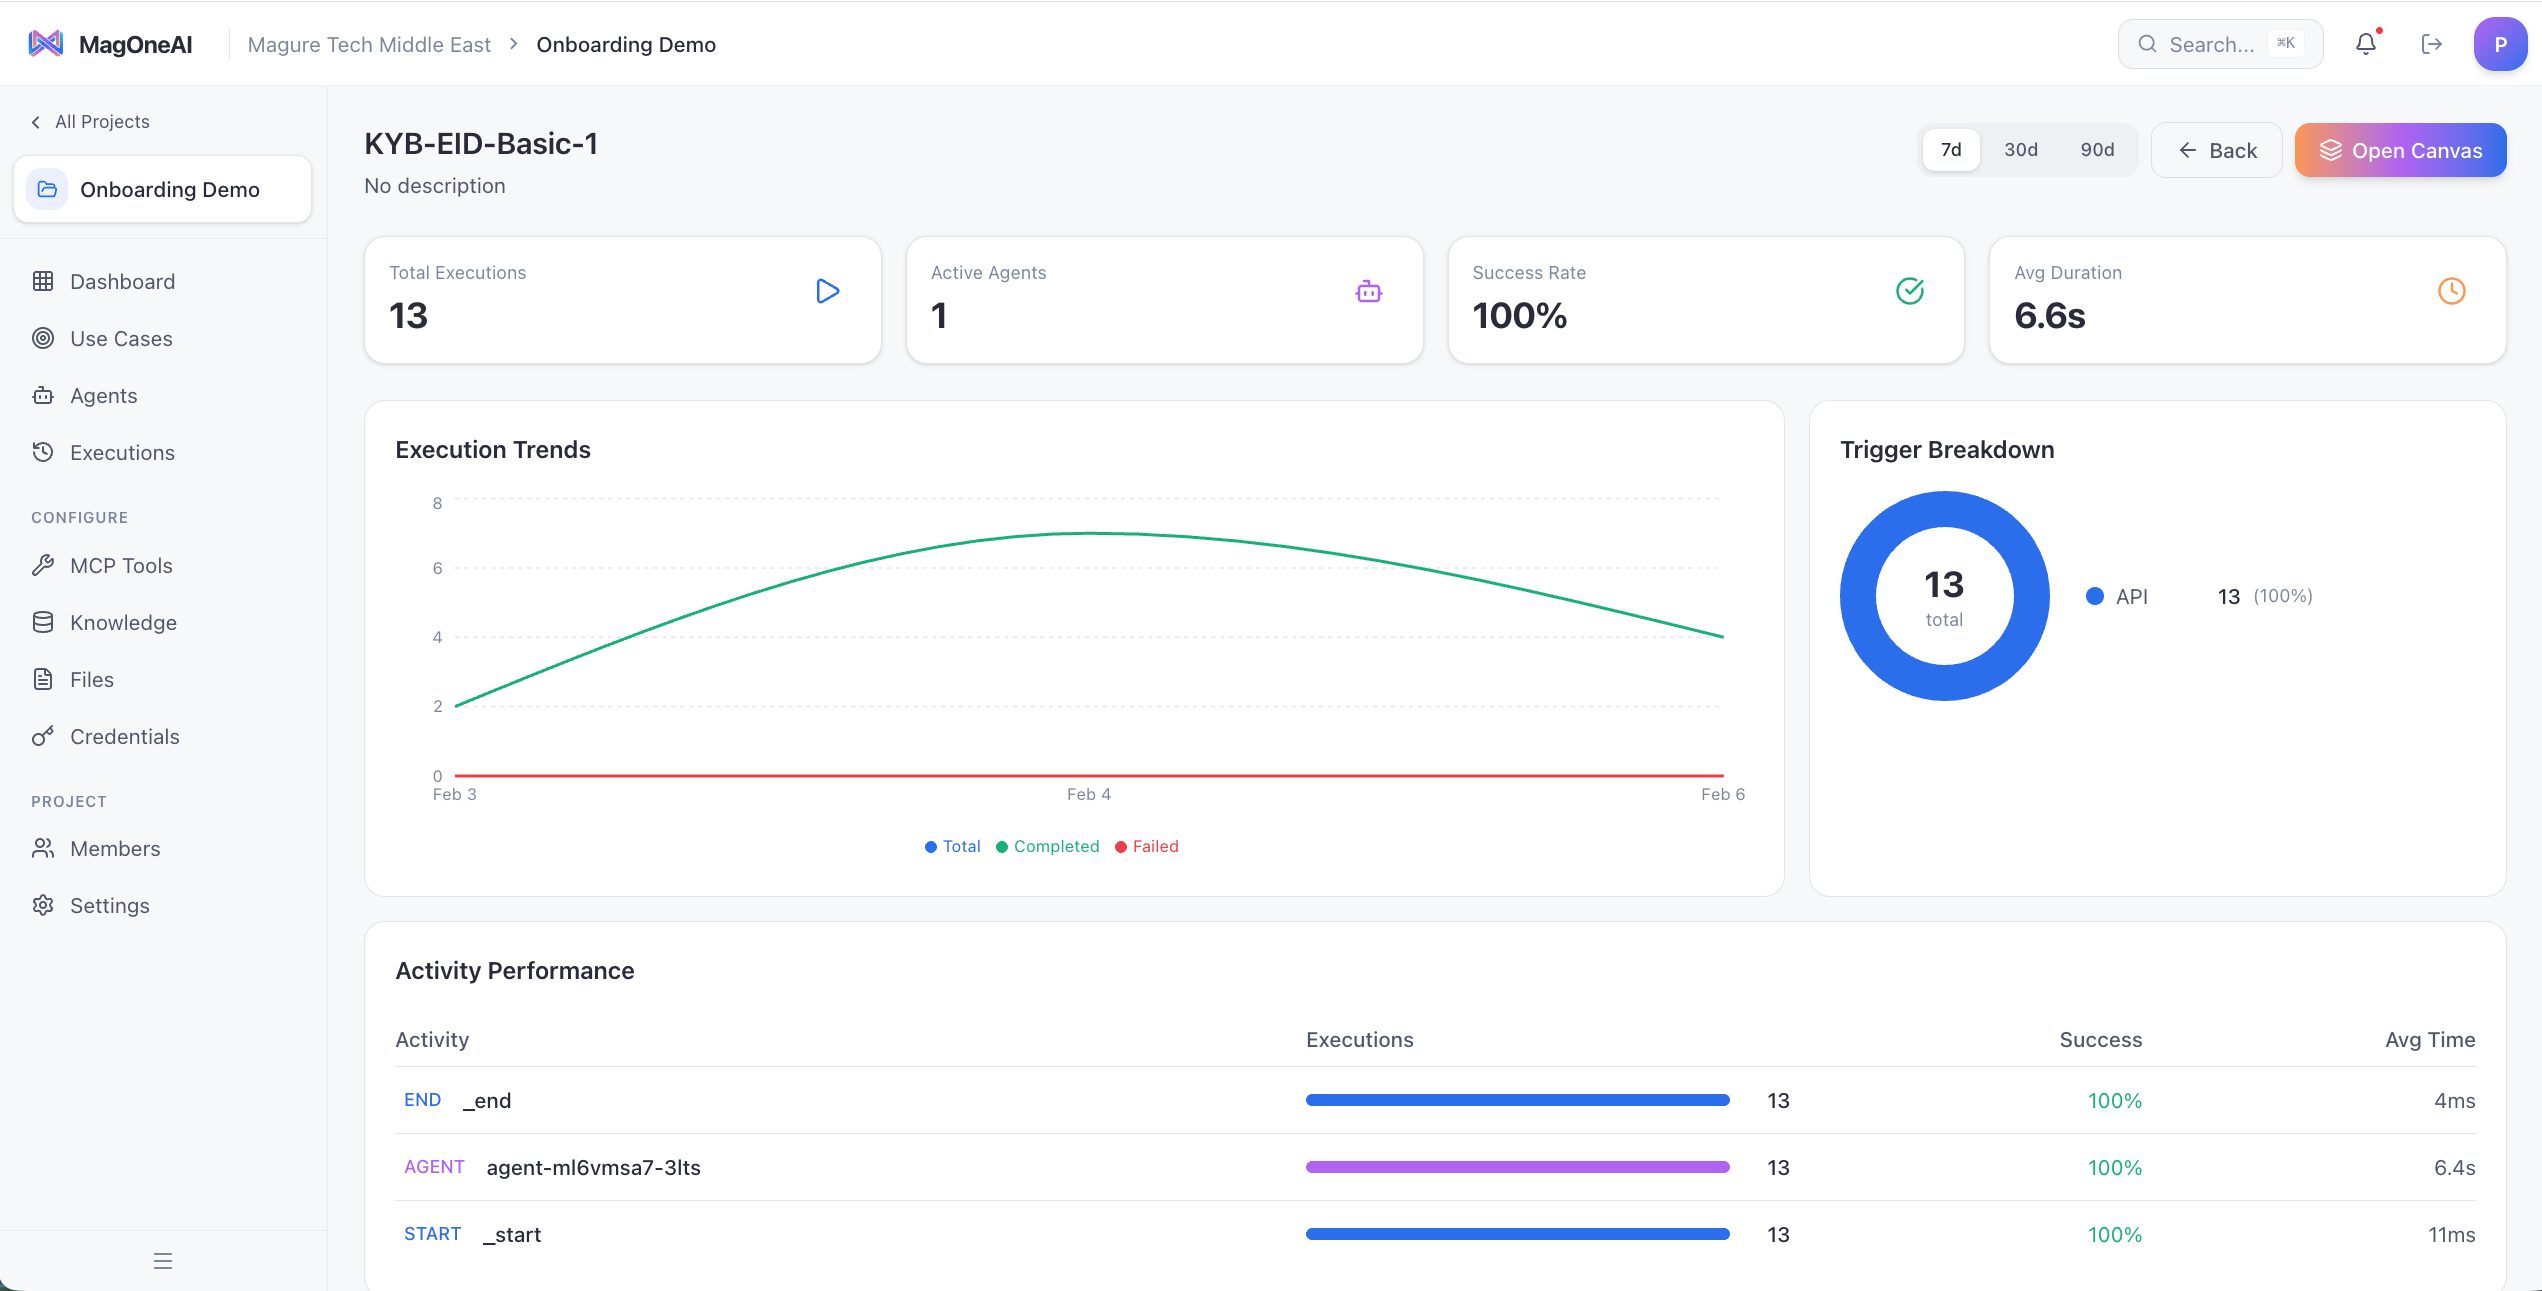
Testing and deployment
MagOneAI Studio provides a complete testing and deployment workflow.Test workflows from Studio
Before deploying, test your workflow:- Run workflow — Click the Test button to execute the workflow
- Provide test inputs — Enter sample data for workflow variables
- View real-time execution — Watch activities execute in real-time on the canvas
View execution logs and debug
After a test run, inspect the results:- Execution timeline — See how long each activity took
- Activity inputs and outputs — Inspect data flowing through the workflow
- Agent reasoning traces — View the LLM’s reasoning and tool calls
- Error messages — Debug failures with detailed error logs
Deploy to production
When you’re ready to deploy:- Review the workflow — Ensure all activities are configured correctly
- Set up triggers — Configure how the workflow should be triggered (API, schedule, chat)
- Click Deploy — The workflow becomes available for production use
- Monitor executions — Use the analytics dashboard to track performance
Analytics dashboard
MagOneAI Studio includes a comprehensive analytics dashboard for monitoring workflow performance.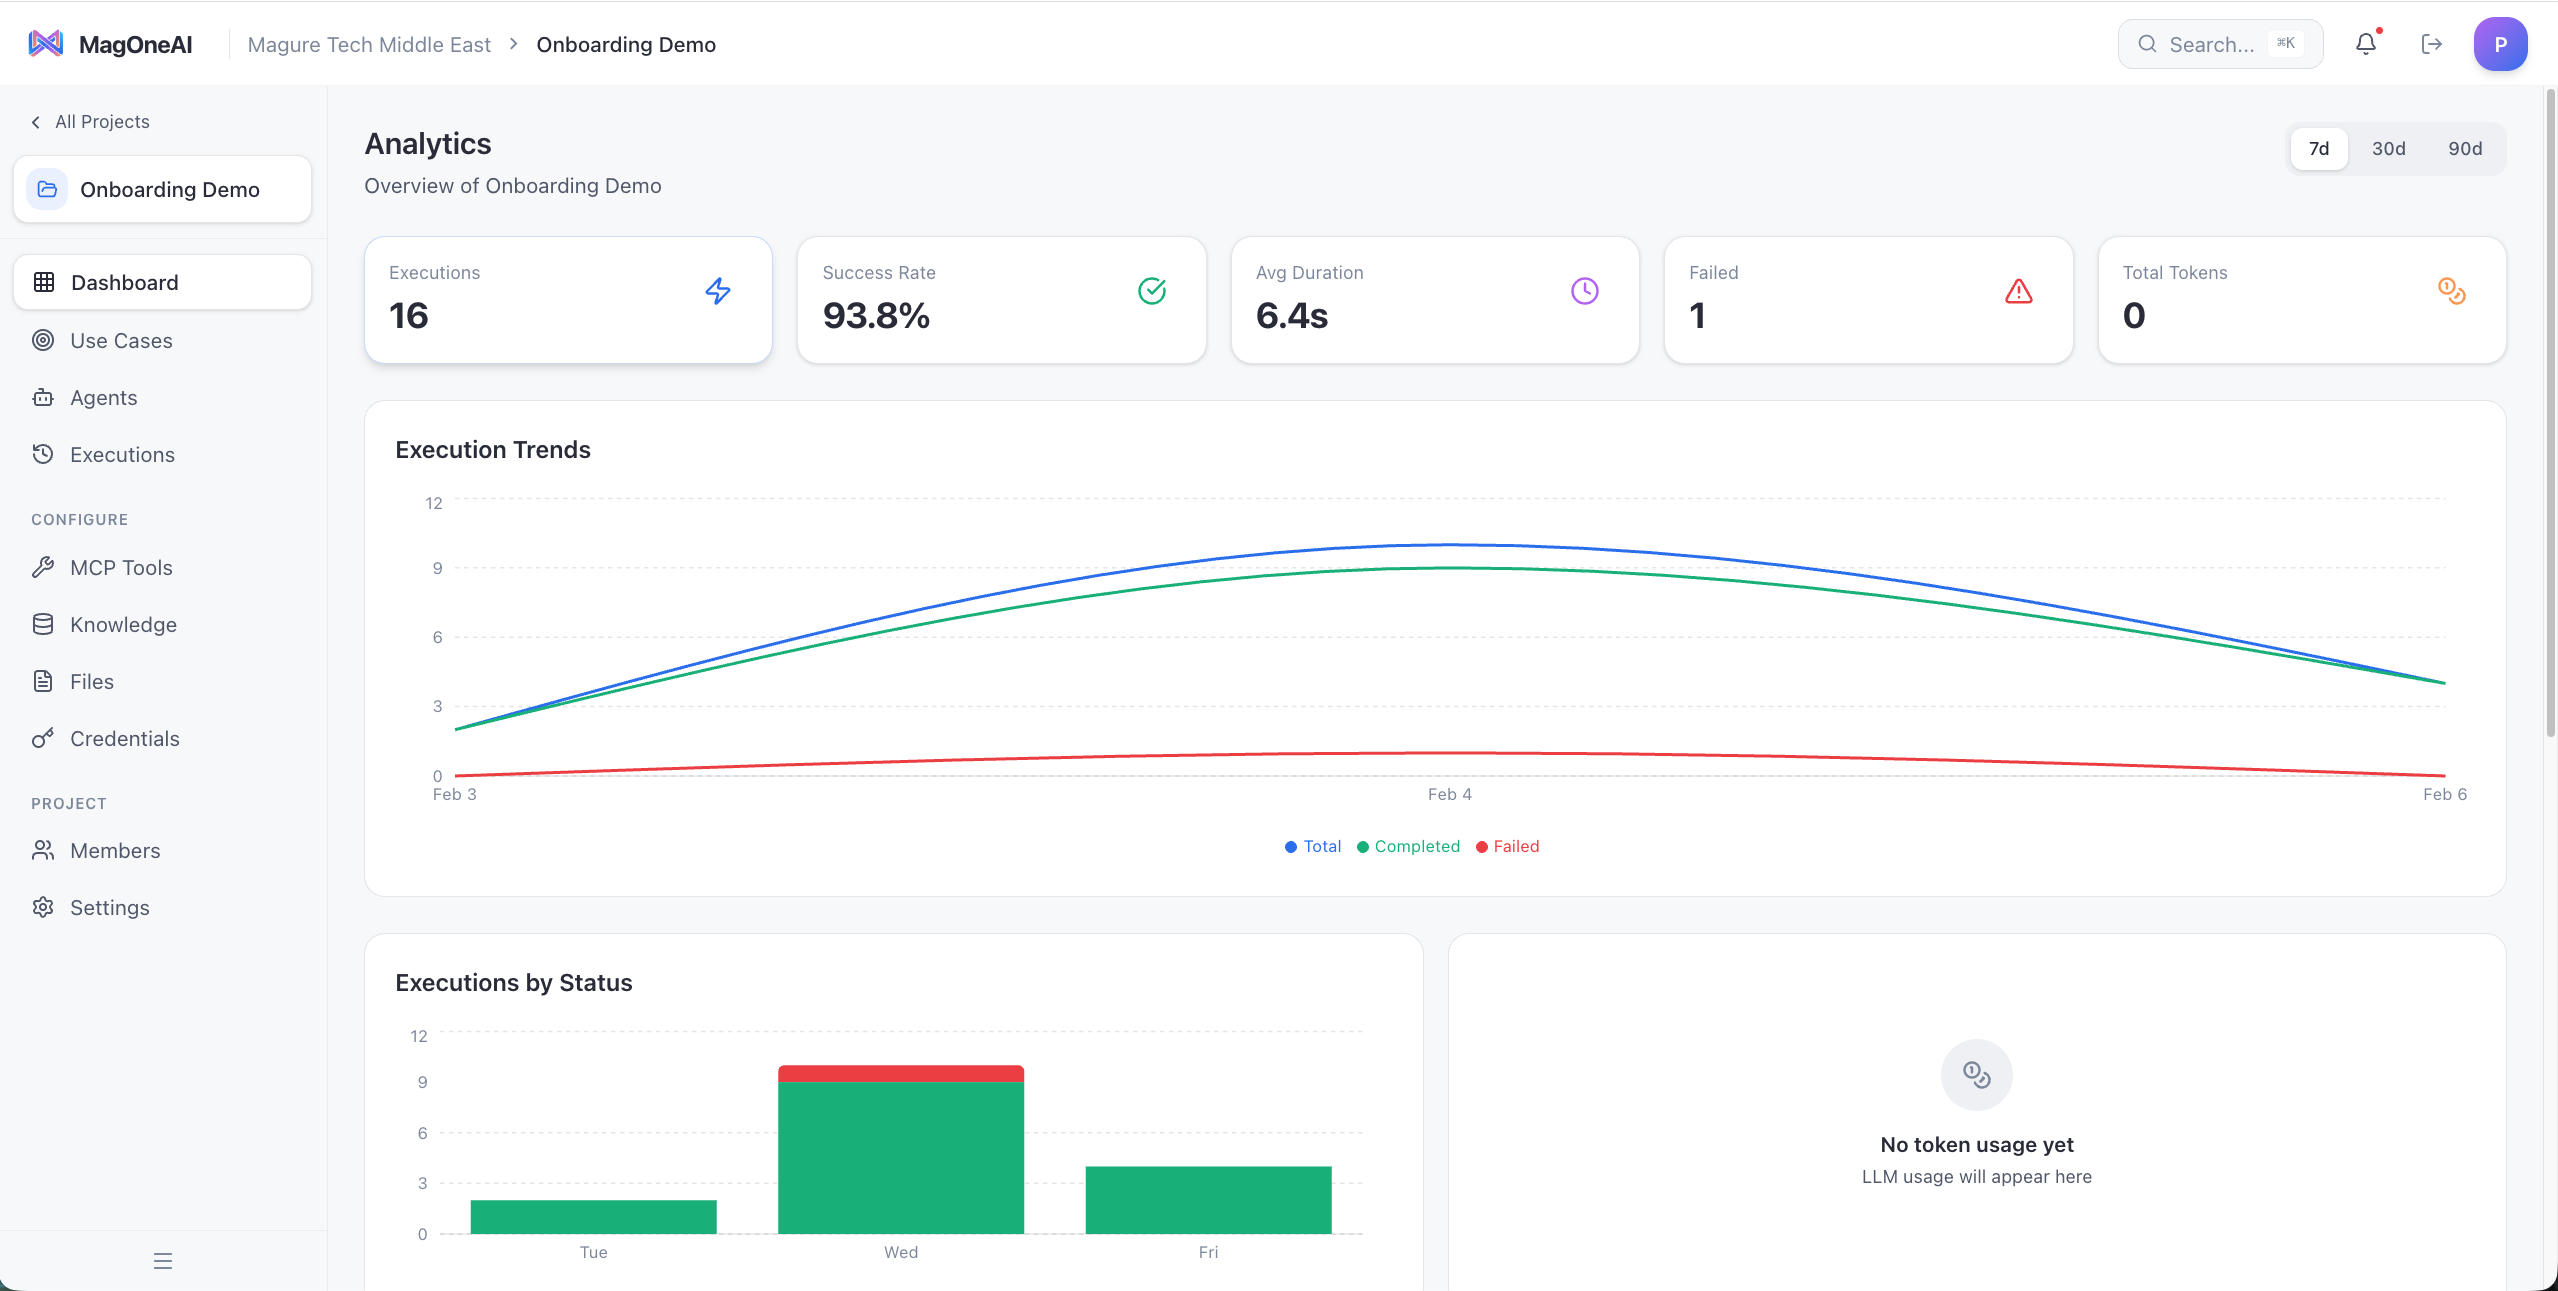
Execution metrics and trends
Track workflow usage over time:- Total executions — How many times the workflow has run
- Success rate — Percentage of successful vs. failed executions
- Average duration — How long workflows typically take
- Execution trends — Graphs showing usage patterns over days, weeks, or months
Activity-level performance
Drill down into individual activities:- Activity execution counts — Which activities run most often
- Activity durations — Which activities are bottlenecks
- Agent performance — Track LLM token usage, tool call frequency, and response quality
- Error rates per activity — Identify problematic nodes
Cost tracking
Monitor LLM and execution costs:- Token usage per agent — Track LLM API consumption
- Cost per execution — Estimate workflow operating costs
- Cost trends — Identify cost spikes or optimization opportunities
Best practices for building in MagOneAI Studio
Next steps
Workflow builder guide
Step-by-step tutorial: build your first workflow from scratch
MagOneAI Hub
Learn about the end-user interface for chatting with AI and running workflows